
Identifying and Explaining Each Programming Icon
1. The first icon is a motor icon. The motor icon is used to to signify which motor is being used,whether it be A, B or C or anyone in between. It can modify the power output of the the motors and can also signal whether to go forward, backward, coast or brake.
2. The second icon is a press sensor. If it is pushed in it will do a certain program and if it isn't pushed it will also do a certain program
3. The third icon is an icon on a wait period. It can be used to tell a certain icon to wait for a certain amount of time
4. The 4th icon is a light icon. If there is a fluctuation in light a certain program will run
5. The 5th icon is a turning icon, it is used for a robot to turn instead of having two use the motor icon and have one going forward and one going backward.
6. The 6th icon is another sensor but it is a touch sensor. if it is touched a certain program will run and if it isn't touch a different program will run.
7. The 7th icon is a structure. This particular structure is used to have a certain program run for a certain amount of times so the user doesn't have to re-download.
8. The 8th icon is a true-false structure. It is used on par with a touch senor in most cases and is used to have two different programs when a certain criteria is met.
9. The 9th icon is an icon just like the 8th icon. It is another structure where it is used to a have a certain program keep running without the user having to re-download the program.
10. The 10th icon is a less than icon. If the value is set less than the value the program will run. If it greater than the value then it wont run.
11. The 11th icon is a greater than icon. If the value is less than the value the program won't run but if it is greater than the program will run.
12. The 12th icon is an icon on power. The power can be adjusted so the motor can meet that criteria. The motor can be slowed down or speed up.
13. The 13th icon is a brake icon. The brake icon is used for a motor to brake and stop.
The Eight Steps to the Engineer Design Process
1. Identify the Problem - Find out the problem
2. Research the Problem - Find out what is needed to fix the problem
3. Develop the Solutions - Find multiple solutions
4. Select the Best Possible Solution - Select the best possible solution that will best fix the problem
5. Construct a Prototype - Build a robot based on the solutions
6. Test and Evaluate - Test the prototype and evaluate it on its performance
7. Communicate the Solutions - Find more solutions to the problem and communicate them with your group
8. Redesign - Redesign the robot and repeat the process
Making Computer Programs
Roach Bot Program
Line Follower Program
Drive Distance Program
Bug Bot Program
Clapping Hands Program
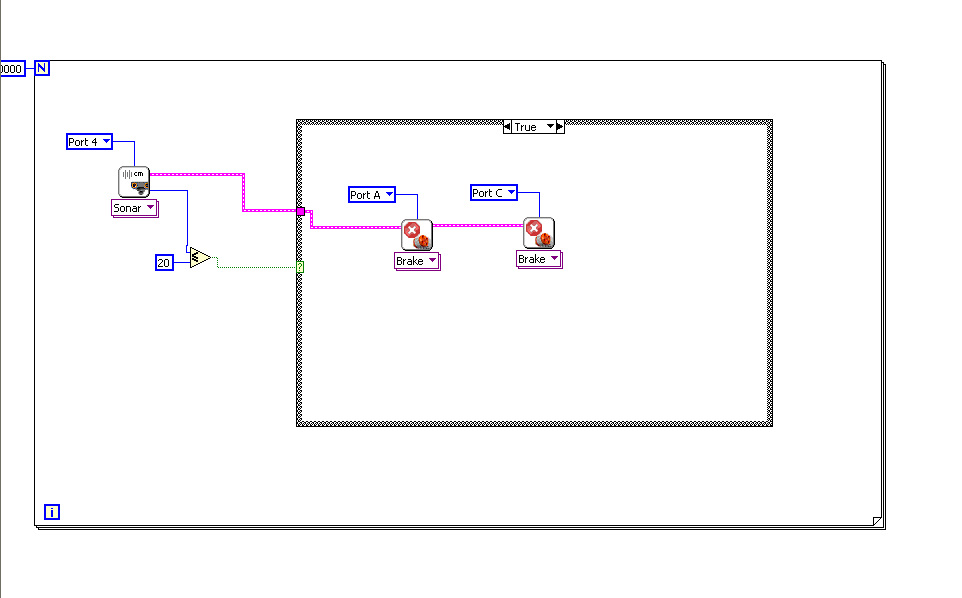
Ultrasonic Sensor Stopping 20 cm
Circle Program
1. A big gear driving a small gear makes the robot move faster, creating more speed
2. A small gear driving a big gear makes it go slower, creating more torque
2. A small gear driving a big gear makes it go slower, creating more torque
Identifying Computer Programs
1st Computer Code
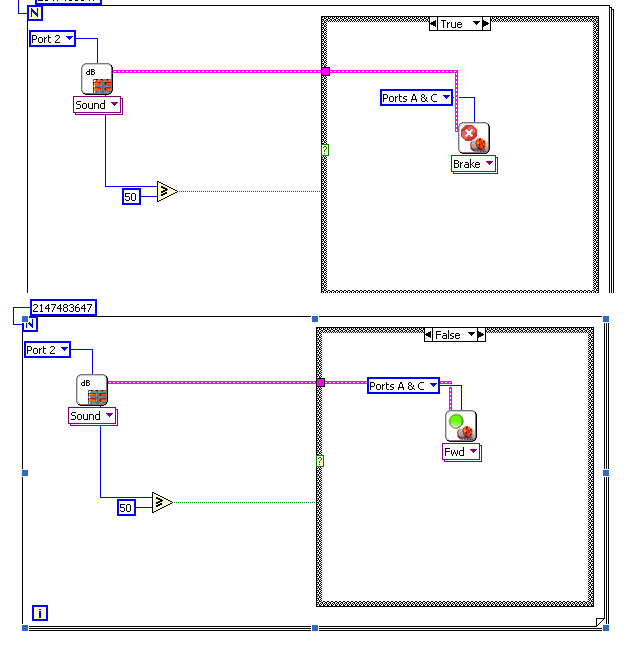
This program makes the robot start moving forward with a sound sensor. Once a loud noise is heard the robot will start to move forward.
2nd Computer Code
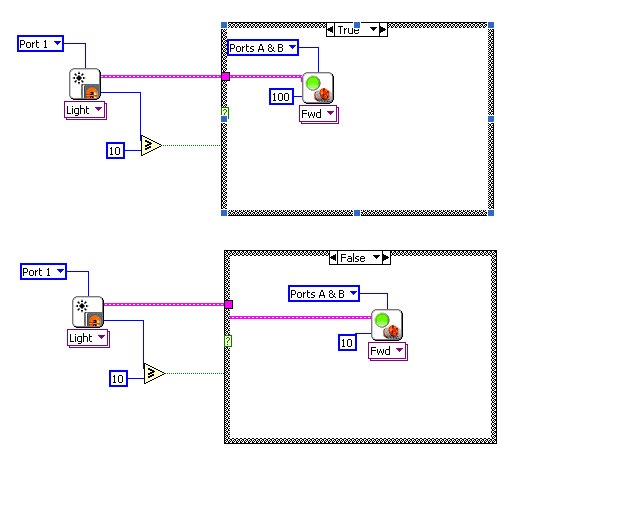
This program makes a robot move forward when the press sensor it pressed in. If it isn't pressed in it will move backward.
3rd Computer Code
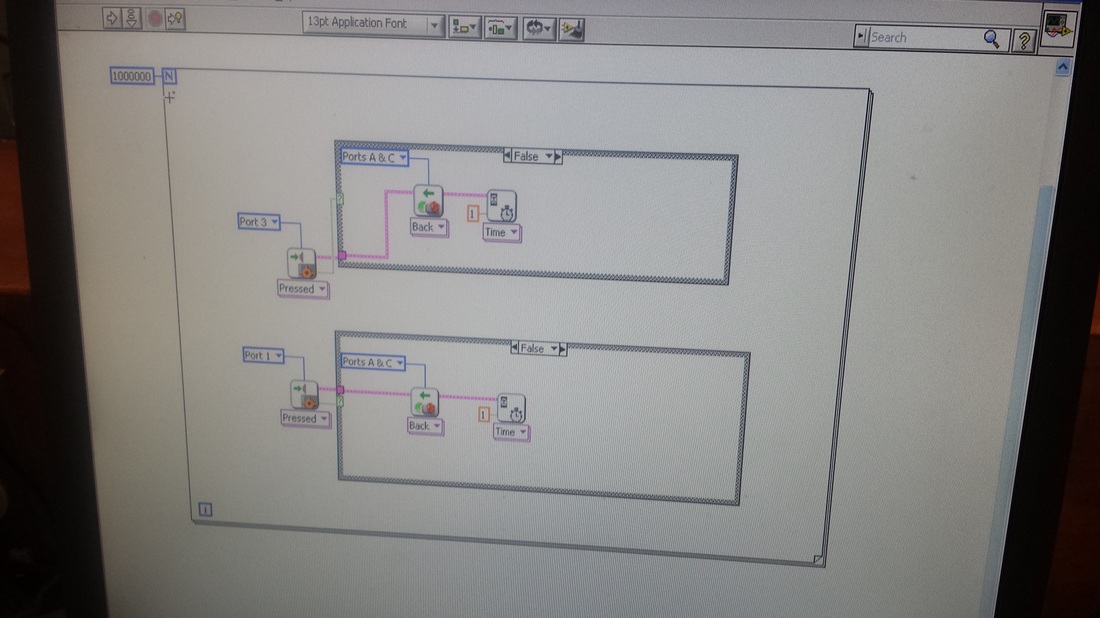
This program makes the robot move and turn once the press sensors are pressed. The robot will move backwards once the sensors are pressed and turn for three seconds. After the 3 seconds are up, a noise will play from the robot.
4th Computer Code
When the robot is within 55 cm of an object, the ultrasonic sensor will recognize the distance. The robot will brake and turn for 1.9 seconds. It will then brake for 1 second and then move forward for 1.5 seconds. The robot will then brake again and then turn for another 1.9 seconds. After the last 1.9 seconds a sound will play. If the robot isn't within 55 cm of an object, the robot will just move forward,.
1st Computer Code
This program makes the robot start moving forward with a sound sensor. Once a loud noise is heard the robot will start to move forward.
2nd Computer Code
This program makes a robot move forward when the press sensor it pressed in. If it isn't pressed in it will move backward.
3rd Computer Code
This program makes the robot move and turn once the press sensors are pressed. The robot will move backwards once the sensors are pressed and turn for three seconds. After the 3 seconds are up, a noise will play from the robot.
4th Computer Code
When the robot is within 55 cm of an object, the ultrasonic sensor will recognize the distance. The robot will brake and turn for 1.9 seconds. It will then brake for 1 second and then move forward for 1.5 seconds. The robot will then brake again and then turn for another 1.9 seconds. After the last 1.9 seconds a sound will play. If the robot isn't within 55 cm of an object, the robot will just move forward,.
25 Things We've Learned in Robotics
1. How to program a robot to make it perform a specific task.
2. How to build a robot to be controlled a specific way.
3. How to properly use weebly for school.
4. There is no easy way to get a grade, you need to put in the time and effort.
5. There's more than one way to solve a problem.
6. Learned how to use the engineering design process.
7. I learned how to identify different icons in labview.
8. I learned how to use labview to program our robots.
9. I learned how to control our robots using our phones.
10. I learned how important it's to keep a clean work area
11. I also learned how important it is to keep a complete kit.
12. I learned a lot about robots because of the level 1 assignments
13. I learned how to program a robot to use a sound sensor that is set to a certain amount of decibels
14. Learned gear ratios
15. How to control robot by smart phone
16. Different pieces of the robot
17. How to build a robot
18. How to make a weebly website
19. How to meet a command by programming the robot
20. How to download software to the robot
21. How to use a computer to control the robot
22. How to climb a 90 degree angle
23. How to make a swivel wheel
24. How to make a robot go faster or slower
25. How to use a line sensor
26. How to use a sound sensor
